Blackberry z10 specification

RIM kept saying that it had a miraculous new BlackBerry in the wings with a new operating system called BlackBerry 10. But it was delayed and delayed and delayed. Nobody believed anything RIM said anymore. Besides—even if there were some great phone, what prayer did RIM have of catching up to the iPhone and Android phones now? Even Microsoft, with its slick, quick Windows Phone, hasn't managed that trick. 

RIM's bet-the-farm phone is finally here. And guess what? It's lovely, fast and efficient, bristling with fresh, useful ideas

specification

Size (L x W x D)
130mm x 65.6mm x 9mm

Dispay
4.2”, four-point multitouch LCD display, 1280 x 768 resolution at 356dpi, touch on lens

Software
BlackBerry 10 OS

Memory
2GB RAM, 16GB Flash, hot-swappable Micro SD slot (up to 32GB)

Processor
Dual core 1.5 GHz

Battery life
  • Talk time:
Up to 10 hours on 3G
  • Standby time
Up to 305 hours on 3G, up to 316 hours on 2G
  • Audio playback
Up to 60 hours
  • Video playback
Up to 11 hours

Camera
8MP rear-facing camera, autofocus, 5x digital zoom, 1080p HD video recording, 2MP front-facing camera, 3x digital zoom, 720p HD video recording

GPS
Assisted, autonomous, and simultaneous

Bluetooth
Bluetooth 4.0 low energy

Wi-Fi
802.11 a/b/g/n enabled, 4G mobile hotspot

Advanced sensors
Assisted, autonomous and simultaneous GPS accelerometer, magnetometer, proximity, gyroscope, ambient light sensor

subscribe Us on YouTube--> www.youtube.com/user/WeezyTechStuff


How to install Windows 8 from USB flash drive

Requirement :-

  • A flash drive (4 GB or more) 
  • A Windows 8 DVD or Windows 8 ISO file 
  • Access to a working computer, with a DVD drive if you have a Windows 8 DVD, with Windows 8, Windows 7, Windows Vista, or Windows XP installed
Important: If you have a Windows 8 ISO file and want that on a flash drive, start with Step 2. If you have a Windows 8 DVD and need that on the flash drive, start with Step 1.

Here's How:

  1. Create an ISO file from the Windows 8 DVD. This is the procedure by which you create a single file, called an ISO image, that contains all the data stored on the Windows 8 setup DVD disc.

    Once you have an ISO image created from your Windows 8 disc, come back here and continue on with this tutorial which will explain how to get that ISO file onto a flash drive.

    Note: If you already know how to create ISO files with your favorite program, often called "ripping," then do so in whatever way you're used to doing it. However, if you've never created an ISO image, or don't have a program installed right now that does it, please see the linked tutorial above for complete instructions on doing so with a free program.
  2. Download the Windows 7 USB/DVD Download Toolfrom Microsoft and then install it.

    This free program from Microsoft properly formats your flash drive and then copies the contents of the Windows 8 installation ISO file you have to that flash drive.

    Note: Don't worry that this program has Windows 7 in the title. This program works perfectly well with Windows 8 ISO files and can be installed in Windows 8, Windows 7,Windows Vista, or Windows XP.
  3. Start the Windows 7 USB DVD Download Tool program. You should be able to find the shortcut on the Desktop, as well as in your Start menu or on your Start screen, depending on which version of Windows you installed the program on.
  4. Click Browse on the Step 1 of 4: Choose ISO file screen.
  5. Locate, and then select, your Windows 8 ISO file. Then click or touch Open.

    Note: If you downloaded Windows 8 from Microsoft, check your Downloads folder or your Desktop for the ISO image. If you created an ISO image from your Windows 8 DVD, the ISO file will be wherever you created it to.
  6. Click or touch Next.
  7. Choose USB device on the Step 2 of 4: Choose media type screen.

    Note: As you can see here, there is also a DVD option. While it doesn't do us much good in this case, since the end game is to get Windows 8's setup files on a flash drive, you could also use this tool to burn a Windows 8 ISO image to a DVD or BD disc.
  8. On the Step 3 of 4: Insert USB device screen, choose from the drop-down box the flash drive or USB-connected external hard drive you want to put the Windows 8 setup files onto and then touch or click Begin copying.

    Tip: If you haven't yet plugged in the USB storage device you're planning on using, you can do that now and then touch or click the blue refresh button to make it show up in the list.
  9. Click or touch Erase USB Device if you're prompted to do so on a Not Enough Free Spacewindow. If you don't see this, don't worry, it just means that your flash drive or external hard disk is already empty.

    Important: If this message didn't make it apparent, you should know that whatever data you might have on this drive is going to be erased as part of the process of getting the Windows 8 setup files copied.
  10. On Step 4 of 4: Creating bootable USB device, just wait for the Windows 7 USB DVD Download Tool to prepare the drive and copy the Windows 8 installation files to it.

    The first Status you see will be Formatting, which will take anywhere from a few to several seconds, depending on how large the USB drive is that you're using. Next will beCopying files which could take anywhere from 15 to 30 minutes, possibly longer, depending on which Windows 8 ISO file you're working from, as well as on how fast your flash drive, USB connection, and computer is.

    Tip: Don't worry if the percentage indicator jumps ahead quickly but then sits on a single number for a very long time. While it might not make a lot of sense to behave that way, it doesn't necessarily mean anything is wrong.
  11. Assuming everything went as planned, the next screen should say Bootable USB device created successfully with a Status that says Backup completed.

    You can now close the Windows 7 USB DVD Download Tool program window. The flash drive, or other external USB drive you're using, now has the necessary files on it to install Windows 8 and is also properly configured to be booted from.
  12. Boot from the USB device that you just created to start the Windows 8 install process.

    Tip: If the Windows 8 setup process doesn't start, it's very likely that you'll need to make boot order changes in the BIOS. See How To Change the Boot Order in BIOS if you need help doing that.

    Tip: If you have a UEFI based system and you still can't boot Windows 8 Setup from the flash drive, even after setting the USB device first in the boot order, see Tip #1 below for help.

    Note: If you came here from my How To Clean Install Windows 8 tutorial, you can return there now to continue the walk through of that process.

Tips:

  1. The Windows 7 USB DVD Download Tool formats the USB drive as NTFS, a file system that many UEFI based computers will not boot from when on a USB drive.

    To work around this issue, you'll need to copy the data off the flash drive, reformat the flash drive using the older FAT32 file system, and then copy the data back onto it.
How to Make Bootable USB

How to install Windows 8 from Bootable USB


subscribe Us on YouTube--> www.youtube.com/user/WeezyTechStuff

Sony PlayStation 4, review and expectations

PS4 Concept Design
In 1994 Sony launched PlayStation and change the view of gaming. it become a huge sales product and change the way of console gaming. many other already in this competition but sony manage to win race all time they sold 102.49 million Units of PlayStation ,and then launched PlayStation 2 in year 2000 and sold over 153.6 million units of that. in 2006 they launched PlayStation 3 the price was so high so people were looking for other option like Xbox 360 which was released 1 year before PS3 so sales was dropped heavenly it fall down to 70.2 million

6 year latter sony launching there PlayStation 4, CEO of sony recently said that they are thinking realease date after microsoft launch there Xbox 720.

Specifications :-

(specs are based on latest leaked and rumors coming out about PS4 )

Operating System:-

PS4 XrossMediaBar + Gaikai cloud serviceRedesigned to be more user-friendly and fluid

CPU or APU:-

APU - AMD A8-3850 Quad Core 2.9GHz/per core or AMD A10 (Likely, statistics unknown) or
CPU - 9.66 GHz POWER7 Cell Broadband Engine (4, 6, or 8 cores) or
CBE 2 with 10 PPE & 12 SPEs {all APUs/CPUs at 45, 32, or 22nm}

Storage capacity :-

2.5 inch SATA (1,2,or 3) HDD (1 TB) or 20-100GB SSD, openly upgradable or standard 256GB hard drive, openly upgradable (likely)

Memory RAM:-

1Gb of XDR or XDR2 up to 8GHz, VRAM {listed below in GPU} or 8GB to 16GB standard RAM (likely)

Graphics GPU:-

1 GHz AMD HD 7670 with 1GB GDDR5 at 1GHz VRAM or 1.6 GHz NVIDIA/SCEI RSX 'Reality Synthesizer' RSX 2 with 4GB of VRAM

L2 Cache:-

A8 = 1MB/per core (4MB) or POWER7 = 256 KB/core (1-2MB)

HDMI display:-

480p, 576p, 720p, 1080i, 1080p

Primary Game Media:-

8x Blu-ray BD-ROM (54-128GB of data) at 36MB/s

Primary Media:-

Blu-ray 8x, DVD, Compact Disc, Download

Backword Copatibility:-

Compatable with all past PS3 PlayStation Network Purchases (likely)

I/O ports:-

{will likely match or exceed current PS3 models}, will at least include HDMI, Ethernet and built-in Wi-Fi (likely)

Online :-

PS Network (Free) + PlayStation Network Plus (paid service) + Gaikai cloud service


subscribe Us on YouTube--> www.youtube.com/user/WeezyTechStuff

Micromax canvas HD A116 In your Budget with quad core

Good news for the big screen smart phone lovers and specially those who want them in budget price. Well Micromax has announced awesome series canvas next version Canvas HD A116 releasing in the starting of February 2013 (may be n 1st week) which is fairly compare to Samsung Note II


if you cant afford to buy Samsung Note II which price you almost 36k to 37k (current market price) then you have good solution for that. you can buy Micromax A110 instead in less than half of note II around 14k to 15 k . Both the Canvas HD and the Galaxy Note II are powered by quad core processors - a 1.2GHz Cortex A7 on a MediaTek MT6589 chipset in the former and a 1.6GHz Cortex A9 on an Exynos 4412 chipset in the latter. It's worth pointing out here that although both processors may seem similar, the Exynos 4412 powers a bunch of premium, high performance devices such as the Galaxy S3 and the Galaxy Tab 10.1, the MediaTek SoC is currently only being used in budget phones.
It comes with 1 Gb Ram and 4 Gb of internal storage can be expendable up to 64 Gb

Price:-

  14000 INR (approx)

Specs:-

  • 5-inch HD 16.7 million color IPS display (1280 x 720 pixels)

  • 1.2 GHz quad-core MediaTek MT6589 processor
  • Android 4.1 – Jelly Bean
  • 8MP rear camera with LED Flash, The same VGA front-facing camera
  • 1GB RAM, 4GB internal memory, 32GB Expandable Memory
  • 3G, WiFi 802.11 b/g/n, Bluetooth, GPS/A-GPS
  • 2100 mAh battery
Like Us On --> www.facebook.com/weezytechstuff/
subscribe Us on YouTube--> www.youtube.com/user/WeezyTechStuff

Samsung galaxy Grand launched, Budget phone with good specification


Many of us looking for galaxy S IV, xperia z  and many other awesome smart phone and tablets are coming from HTC, Sony and Samsung itself. Samsung got surprises in Indian market launched "Samsung galaxy Grand "  on 22nd Jan 13 . as they announced in december of 2012

price :

 21000 (may also varies to 17000 to 21000 ) according to city 


Samsung Galaxy Grand features a 5" WVGA TFT display and runs on Android 4.1 Jelly Bean. The smartphone is powered by a 1.2 GHz dual core processor along with 1 GB of RAM. The smartphone has an 8 MP camera with LED flash at the back and a 2 MP shooter in the front.

The dual-SIM smartphone offers 8GB of storage and supports memory expansion up to 64GB via the microSD card slot. Samsung Galaxy Grand runs on a 2100mAH battery and comes with few cool home-backed features like S Voice, Direct call, Smart alert, Popup play along with the Multi-View functionality, which allows the users to access two apps simultaneously.

Specs:-

  • 5-inch WVGA TFT LCD display with a resolution of 480 x 800 pixels
  • 3G, EDGE/GPRS, Wi-Fi capabilities
  • A-GPS Glonass
  • Bluetooth
  • 8MP camera
  • 8GB + microSD expandable up to 64GB

  • Like Us On --> www.facebook.com/weezytechstuff/
    subscribe Us on YouTube--> www.youtube.com/user/WeezyTechStuff

    How to Delete Facebook account permanently ?


    So are you want to delete your Facebook account permanently ? but while your are going to do this you are just having deactivate option.. it quit tricky that even if we deactivate our account our private info, msg, pictures are still there on web.

    Here is the solution :- 

    Login with Your Facebook account

    Click Here 

    Important : After deleting your it is first deactivate for 2 weeks if you not log in in with deleted account in 2 weeks it will be deleted permanently . So if you want delete account permanently do not login your account from any platform like iPhone android,your mobile browser or from any other way for 2 weeks (best you clear your saved password and cache and browser history so you will not log in accidentally ) 

    How To increase Speed Of Your Browser With DNS changing hacking trick

    Thanks to Pratik Shukla the youngest Indian hacker. he's the cyber crime expert and guiding many of industries to prevent there systems against cyber crime and hacking.

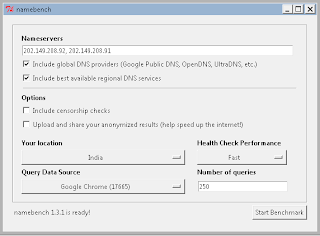
    Most people use the default DNS settings provided by their ISP, and while they are usually sufficient for most purposes, there are plenty of free options out there, like OpenDNS and Google DNS. Namebench is a free app that checks to see whether your current settings are optimized and, if not, which free option is best for you. Here's how to use it:

    Download and install Namebench.
    Fire it up and choose your settings. Keep the top two boxes checked. If you're concerned about network censorship, check the third box, and if you want to help the developers, check the last box. You can tweak the rest if you're outside U.S. or want to experiment with different browsers.

    Click Start Benchmark and wait till Namebench runs its tests. It should take several minutes. A browser tab should pop open when Namebench is done and give you a list of DNS servers and how much faster they are than the one you're currently using, unless yours are already the fastest possible.

    Namebench does not change your settings, but it's generally pretty easy to do it yourself. Check with the instructions you got from your ISP to set up your modem and/or router and just substitute the DNS addresses you received from Namebench for the addresses given by your ISP. It's best to do this with your router, as it will assign that DNS address for all the devices attached to it.

    That's it! This can dramatically improve your browsing speed, and it's fairly easy to work through.

    ©www.hackingwithprateek.in

    Add Forum free To Your Blog,Website,Fb Page or any other medium

    Forum is one of important thing that needs tho have on your site / blog or anywhere where you share your experience or having need of topics discussion

    Today We are Going to look out how to add forum to blog or website or Facebook or any other medium that capable to have embed your code and it will appear same for each platform so any one can participate in your discussion topic from anywhere whether it is from your blog or website or Facebook ,etc

    The Solution Is

    Nabble.Com

    It provide free forum to you and also gives you ready made code for embed to your site blog or anywhere you can use it as per capabilities

    Step 1:-  Create Forum on nabble.com

     Go to Nabble.com Click on Start Free forum 
    Fill The Form appear 
    Fill Form To create Free forum

    confirm your email link
    your account will be created
    Then Click on  "Option" then on "Embedding options"
    Click Otion --> then Embedding Option
    Then Copy embedding code for your forum
    copy code

    Step 2:-  Add Code To blogger

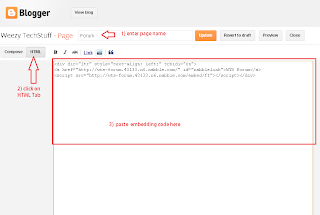
    Go to blogger Dashboard Then Click on Pages --> click on new page --> then click on Blank Page
    creating new page in blog
    Enter Page Title---> Click On HTML Tab --> Paste Code in Text field (coding area)

    Click on Publish Button  (in above image i already published so it's showing update button instead of publish )


    Add Forum To Facebook


    • Follow Step one if you don't have created any forum (else just copy embedding code from already created forum)
    • Search For any "HTML iFrame App" install it to your page where you want to add forum Click Here for iFrame App
    • Edit installed app and paste code in coding section (diff apps have diff procedure so its not discuss detailed here you can find easily apps coding section) 
    • Finish you are done .. check your tab and enjoy forum


    if you want to add to your website or any where just always follow step 1 then paste code to page or coding section where you want to include forum  

    always use same code of same forum if you want it appear same at every where 
    Demo- 
    FB Forum Link   http://statictab.com/4q85dp4 

    _____________________________________________________________________
    Like Us On --> www.facebook.com/weezytechstuff/

    subscribe Us on YouTube--> www.youtube.com/user/WeezyTechStuff

    HTC Butterfly |Specifications,Price and Release Date


    Also known as HTC Deluxe.

    Key Features

     
    • Full-HD Display.
      Full-HD Display. Experience brilliant images every time – on our crystal-clear, 440PPI, 5-inch, 1080p full HD display – delivering superior sharpness, white balance, and color accuracy for everything you see.
    • Two Amazing Cameras in One.
      Two Amazing Cameras in One. Never miss a shot with front and back cameras. Capture high-quality photos that are true to life, regardless of lighting conditions. With this device, it’s easy to look like a pro.
    Quad-Core Snapdragon S4 processor.
    Quad-Core Snapdragon S4 processor. With the power of this unbelievably fast, latest generation, 1.5 GHz Quad-Core S4 processor, multi-tasking is a breeze.


    Specifications of HTC Butterfly:

    Hardware/OS of HTC Butterfly:

    • 1.5 GHz quad core snapdragon S4 processor.
    • GPU: Yes, Adreno 320.
    • Operating system: Android Jelly bean, v4.1, which is upgradable to v4.2.
    • Dimensions: 143 x 70.5 x 9.1 mm.
    • Weight: 141 grams.

    Display of HTC Butterfly:

    • Type: LCD display, capacitive 16M Colors
    • Screen size: 5.0 inches.
    • Screen resolution: 1920×1080 (HD).
    • Supports Multi Touch.

    Camera details of HTC Butterfly:

    • Primary camera: 8 megapixels.
    • Secondary camera: 2.1 with 1080HD @30fpsVideo Recording
    • 1080p Video recording with video stabilization.
    • Camera features include geo-tagging, face and smile detection.

     Connectivity options in HTC Butterfly:

    • GPS: Yes, along with A-GPS and GLONASS support.
    • Micro USB v2.0 port.
    • Bluetooth v4.0 along with A2DP, EDR.
    • GPRS: Yes.
    • Wi-Fi 802.11 b/g/n, dual band, Wi-Fi Direct, can also be used as Wi-Fi hotspot.
    • 3G, HSDPA, HSUPA connectivity, with speeds of 50 mbps.
    • EDGE: Yes.

    Audio options:

    • Supported formats: MP3, WAV, WMA, eAAC+.
    • Alert types include vibrations, MP3 and WAV ringtones.
    • Loud Speaker present.
    • Active noise cancellation through dedicated microphone.
    • 3.5mm Audio Jack for connecting headphones.
    • Headset.

    Memory options in HTC Butterfly:

    • 2048 MB of RAM.
    • Internal memory consists of 16 GB, out of which 12 GB is user accessible.
    • This memory can be expanded up to 32 GB through micro SD card slot.

    Battery specs of HTC Butterfly:

    • Lithium-Ion battery of capacity 2020 mAh.
    • Battery stand-by time and talk time not revealed by the brand.

    Additional features:

    •  Accelerometer, gyro and proximity sensor.
    • Messaging and IM: SMS (includes threaded view), MMS, push email, IM.
    • Radio: Yes.
    • SNS integration.
    • HTML browser.
    • Support for JAVA apps through included JAVA MIDP emulator.
    • Features Predictive text input.
    • Document viewer.
    • Audio to text input.
    • Photo and video editor.
    • HDMI port
    • Predictive text input.
    • Calendar.
    • Google services include Gmail, YouTube, Google talk, Google Maps, Google search through voice.
    After seeing the specs, even you will be sure that this phone is for sure a beast. We are not yet sure about the battery. The official site says it will come with 2000 mAh battery but I don’t think it will not be enough since it is powered by a quad core processor

    Release date in India: 

    End of January 2013

    Price India:

     Expected Rs 43,900


    Like Us On --> www.facebook.com/weezytechstuff/ subscribe Us on YouTube--> www.youtube.com/user/WeezyTechStuff

    NVIDIA Console Project Shield


    GAMING UNLEASHED


    Take your gaming anywhere with Project SHIELD, a gaming portable designed for gamers who yearn to play when, where and how they want. With the advanced processing power of NVIDIA® Tegra® 4, a full-size game controller, breakthrough Wi-Fi technology, and stunning HD video and audio, Project SHIELD redefines what gaming can be.

    Features :


    NVIDIA® Tegra® 4

    THE WORLD'S FASTEST

    MOBILE PROCESSOR

    Custom 72-core NVIDIA GeForce® GPU
    Quad-core A15 CPU

    Controller

    HOW GAMES WERE
    MEANT TO BE PLAYED

    Ultimate control and precision with a full-size console-grade game controller


    Multi Touch Display

    YOUR GAMES HAVE NEVER LOOKED SO GOOD

    5-inch 720p retinal multi-touch display for high fidelity visuals


    Intigrated Speakers

    TURN UP YOUR GAME

    Custom, bass-reflex, tuned port audio system delivers fidelity and custom range never before experienced on a portable device 

    Wi-Fi Connectivity

    NO LAG MEANS NO EXCUSES

    802.11n 2x2 MIMO game-speed Wi-Fi provides high-bandwidth, ultra-fast wireless for seamless game streaming


    Android Jelly Bean 

    Android Jelley bean

    PURE ANDROID, SO NOTHING GETS IN YOUR WAY

    Project SHIELD is stocked with the latest Android Jelly Bean operating system from Google, providing access to all your favorite Android applications and games


    _____________________________________
    Like Us On --> www.facebook.com/weezytechstuff/
    subscribe Us on YouTube--> www.youtube.com/user/WeezyTechStuff

    Facebook popout Like Box widget for bloger Latest (jQuery)


    As always, it is jQuery based widget, and your blog must have the jQuery plugin. if your blog already have a latest jQuery plugin, then Ignore this step and directly follow the Second step.
    If not add the below snippet code before </head> tag

    <script type="text/javascript" src="http://ajax.googleapis.com/ajax/libs/jquery/1.8.2/jquery.js"></script>


    Follow this steps


    • Go TO blogger Dashboard
    • Click on Layout
    • click on Add Gadget
    • Add HTML/JavaScript gadget(click + sign in front of gadget)
    • in Content section paste following code , leave title blank

    Changes have to made


    Replace  your facebook page name With WeezyTechStuff   in the code above

    Additional changes

    If you want wait time of popup in crease or decrease 
    then change the value "10" with no of seconds you want in code above

    var sec = 10


    and


    Please wait..<span>10</span> Seconds